Degoogling Part 1.1: GMail (Remote Email)

This is the second part of a series focused on migrating from Google Workspaces. For Part 0, go here.
I'm going to break this part up into several posts, as there are a few pieces to the email puzzle, and there are too many steps to put in a single post.
What I wanted to replicate
Google Workspaces' email offering has a few convenience features that are hard to replicate elsewhere. In my case I wanted the following.
Multi-domain Support
Over the years I have accumulated a few domain names and email addresses tied to them. It's a bit of a mammoth task to clean up all those aliases and update the dozens of accounts linked to them, so I used Google Workspaces to manage them. Google Workspaces allows you to attach many domains to your main account, and set up aliases for your users using any of the domains. For example, I have hello@ for a few different domains, and they all go to the same inbox. Likewise, I have shaun@ for a few different domains. I wanted to be able to do something similar.
Multi-recipient Email Addresses
My wife and I share an email address, but emails to that address go to each of our inboxes. To do this using Google Workspaces, I created a Group with the shared email address, and subscribed us to the group. I figured this would be a difficult feature to replicate elsewhere.
Backups
I wanted a way to be able to back up my email history and potentially restore it if needed. This can be accomplished a couple of ways in Google Workspaces, but the easiest way is probably to use Google Takeout.
Implementation Plan
I didn't want to self-host a complete mail exchange to handle incoming mail at this stage, because I don't have the hardware or power / network stability for it yet. It's a goal at some point in the future, but not yet. I also have no intention to host my own sending server, as ISPs tend to frown on that sort of thing, and it's a full time job to maintain the reputation of your sending infrastructure (domain, IP address) so that your emails don't get blacklisted or marked as spam by receiving servers.
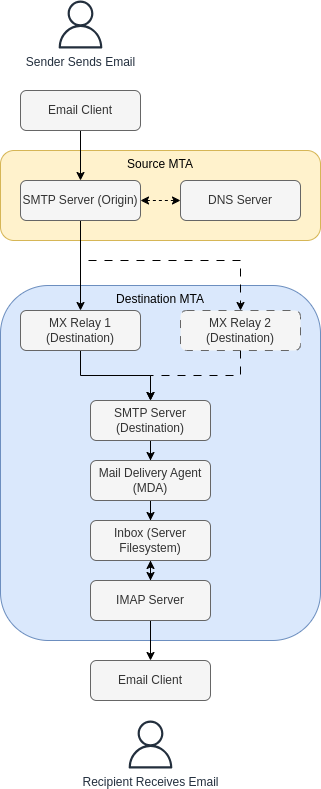
With this in mind, I opted for a hybrid approach: a paid service to route and store incoming mail and send outgoing mail, and a self-hosted system to sync incoming mail locally, provide IMAP access to mailboxes so that email clients such as Thunderbird can check them, and also provide a webmail interface.
Forward Email
Forward Email is, as its name suggests, primarily an email forwarding service. The idea is that you have a few core inboxes, and it monitors all of your configured email addresses and forwards them to the right place. However, they also offer IMAP inboxes and SMTP services.
I had a look at a few different providers before settling on Forward Email. My decision was based on the fact the service seemed to provide all the features I needed to replicate my Workspaces email setup.
I signed up for their Enhanced plan at $USD3 / month, which includes unlimited domains, aliases, and IMAP mailboxes.
The only limits are 1) all of the IMAP mailboxes share a 10GB storage allocation, and 2) 300 outbound emails per day. The storage allocation can be expanded by paying a little more per month. Over 15 years I have accumulated 27GB of emails and attachments in my Workspaces account, and my intention is to use Forward Email's IMAP mailboxes as proxies / temporary storage, so I don't anticipate requiring expanded storage. I will never hit the outbound email limit.
Adding Domains
Once your account is set up, the first step is to add your domains to the account. There are basically two steps - adding the domain itself, and then updating / verifying.

I use Amazon Route53 to manage my DNS, so all I needed to do was update my MX records and add the TXT record. The DNS refresh was quick, so I was able to verify almost immediately.
I just repeated this process for all the domains I wanted to add.
Adding Aliases
I wanted to add two different types of aliases.
- "Primary" Aliases - these are where I will direct all of the other email addresses to. They have an IMAP mailbox attached to them, and have SMTP activated.
- "Secondary" Aliases - these simply forward to the Primary Aliases.
My Primary Aliases are on the snj.au domain, so that is where I added them. I added one for myself, and one for my wife.
To create an alias, first go to the Domains overview. From there, click the Aliases link for your Domain listing.

You will be taken to the Aliases list for the Domain.

Click the Alias + button to create a new Alias.
The Alias Name is the user in front of the @ in the email address. A Primary Alias needs an IMAP mailbox, so make sure this is checked. Incidentally, this also creates a CalDAV calendar store, which we can use later to replicate Gmail's Calendar functionality, but we will get to that in another post.

Secondary Aliases do not have IMAP turned on, but instead need a forwarding recipient. The forwarding recipient will be one the email address for one of your Primary Aliases

This means any email sent to yoursecondaryalias@your.domain will be forwarded to yourprimaryalias@your.domain, and will be stored in the Primary alias's IMAP mailbox.
Multi-Recipient Aliases
I mentioned earlier that my wife and I have a shared email address that forwards to each of our inboxes, and I was using Google Groups in my Workspaces account to facilitate it.
It's actually much easier to do this in Forward Email. All you do is create a regular secondary alias, and add two forwarding recipients (i.e. Primary Alias emails) separated by commas. That's it!
Getting IMAP / SMTP credentials
You will need to generate a password for each of your Primary Aliases to access their IMAP mailboxes, and to send via their SMTP account. To do this, you need to go back to the Aliases list for the domain with your Primary Aliases, and click the Generate Password link.

Once you have clicked the link, you will go through the workflow to generate a password for the alias. The same password will be used for IMAP, SMTP (and CalDAV) authentication, so remember to save it somewhere safe. The workflow gives you plenty of opportunities and reminders to save the password.
Setting Up SMTP
Before SMTP for aliases will work, it needs to be enabled on the domain they will be used on. To do this, use the Advanced Settings for the domain.

You will be walked through the process of setting up and verifying your domain for SMTP.

The main part of the process is creating some more DNS records for the domain and verifying them. Once the verification is done, Forward Email will perform a manual verification before enabling SMTP for the domain. Their ETA is within 24 hours, but usually it is done much faster than this.

Conclusion
At the end of the setup, you will have your domains with aliases configured, and will have the passwords needed to access the IMAP mailboxes for your primary aliases. From here, you can configure an email client to access the IMAP mailboxes directly. However, as mentioned at the beginning of the post, I am only using Forward Email as an intermediary, and my main IMAP services are self-hosted.
In the next post, I will detail how to set up a Docker container with a Mail Delivery Agent and Mail Transfer Agent, with spam and virus protection, powerful mail search integration using elasticsearch, scheduled mailbox backups, and a webmail client.